In Part I, I talked about how the design of a Lego car that can transform into a robot illustrates the process of iterative design. At the beginning of the project, I had the exact requirements and they didn't change at all from the start of the project to the end. However, just having the right requirements did not mean that I could immediately design something that would meet the requirements. At the end of Part I, I had a Lego car that met many of the basic requirements, but still didn't transform. I was stuck because I didn't have the technology that would meet the rest of the requirements.
Part of iterative design is keeping your eyes open, always looking for ways to intelligently expand the solution space. If the information you need is not already at hand, trying variations of things you already know may not lead to a good solution.
Thinking Outside The Box
I had always eschewed the Bionicle Legos as “not really Lego,” so I hadn't originally considerd those. But then two things happened that breathed new life into my Lego project. My son’s third birthday was coming up, and my wife suggested that we make it a Lego birthday. I was responsible for filling the gift boxes for the guests, and I decided to start by visiting the Lego store to see what they might have.
The Lego store had a wide variety of gifts for $5 or less including Duplo dinosaurs, a pony and princess set, knights on horses, and most importantly (for the project) small Bionicle sets. I had never bought a Bionicle set before, so I had never noticed that many of them had articulated joints. The joints were ball-and-socket parts which were small and had enough friction to make them poseable. They were perfect for the project.
There is another kind of Lego set called Exo-Force which has a completely different technology for doing articulated joints and also has a part which when combined with a Bionicle part provides a third technology for articulated joints.
Creating limbs which can fully fold up is a difficult proposition at best. But, I managed to create a couple of variations that allowed me to create the next version of the project. It didn’t really meet the goals of looking like a sports car or hiding the fact that there was more to it than met the eye. It was quite boxy, had odd proportions, and some of the joints were exposed. It was also fairly fragile. But, it could transform!
Sometimes Flexibility is Constraining
Sometimes software that is too generic or two flexible creates another set of problems such as taking too many resources or being too difficult to configure for the task at hand. The knee and elbow joints of the robot form had the same problem. Because they were fully articulated they were just too darn big and difficult to hide. I knew that these joints didn’t need to have the same degrees of freedom as the shoulder, hip, and ankle joints, but had not previously been able to create a hinge that could fold flat and have the full range of motion required. I repeated the exercise of determining all of the available hinge options and found a couple of new ones. The most promising one was a dual Technic hinge which was perfect for the knees.
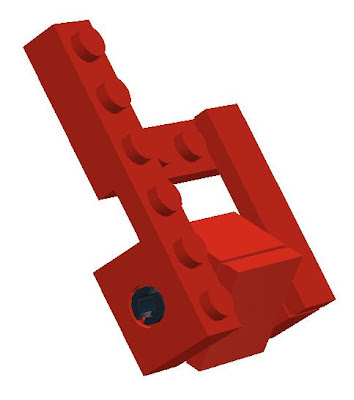
For the arms, this hinge was too large. But then I realized that less resistance was required for the arms and a single hinge would do. Perfect! Now I had the robot skeleton, I just needed the car exterior.
Inspired by Elegant Design
Many months later, when looking for a new Lego set for my son, I saw a new car set (#4939) that was perfect for the project. I’m not an artist by any means, so one of the challenges has been finding Lego car designs to emulate. Previously they had always been either too big or too small. At one point I had been very excited about the Ferrari that comes with both red and yellow exterior pieces, but it was double the size I needed. Set #4939 seemed to be the perfect size. It didn’t hurt that it was very cool looking and reasonably priced. I had the feeling that this was it, I was finally going to achieve the goal.
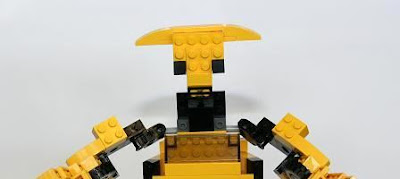
Using set #4939 as inspiration, I was able to layer a car exterior onto the robot skeleton without too much trouble. As a bonus, the head, which had previously never really worked out well, was just there. I was within reach of the goal. But still one problem remained. I couldn’t cover the shoulder and hip joints without preventing transforming. I needed something that would allow the top and bottom parts to slide out and then lock in place. I had created parts that slid from place to place before for other Lego projects, but never something that could also lock in place.
Sliding Into Home
After trying many variations using small hinges to act as the locks, I had something that worked, but it was just too big. It was also very clumsy. Luckily, I was in denial. I forged ahead anyway. I wasn’t sure what to do about it being clumsy, but I was determined to create more room in the model. The most obvious step was to do what they do to create stretch limousines: take a regular limo and stretch it out. I made the whole model a bit longer, wider, and taller while keeping the same overall proportions. I also removed all unnecessary internal parts or replaced them with parts that would still do the job but took up less space.
It wasn’t enough, and I couldn’t stay in denial about the sliding part being clumsy forever. But while I was stretching things out I observed that some of the technic parts would slide around a little bit when I exerted too much pressure on them. Of course, the part that would give depended on the amount of friction. Whichever had less friction was what moved and the other one did not. From that came the solution: two bricks together to anchor the axle, and one brick that moved freely but with enough friction that it would stay wherever it was slid to.
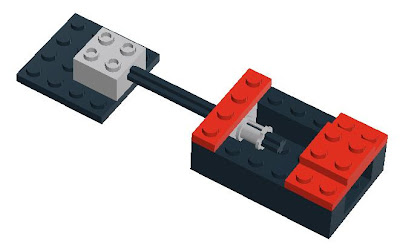
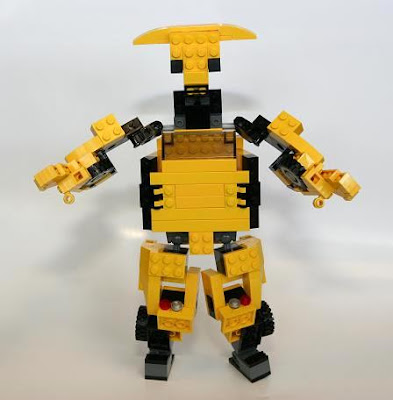
The slider was the last major challenge. Once I had this part, it was just a matter of trial-and-error shifting things around until it all worked. There are two sliders; one for the lower body, and one for the upper body, the following picture shows the car with the upper and lower body pulled out as the first steps of transforming.
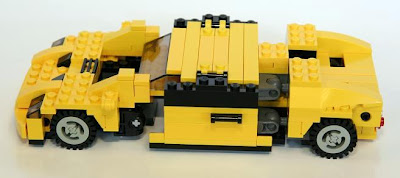
After the car has been extended, the legs are unfolded.
Lastly, the arms are extended. The head is also fully articulated.
There is still room for improvement, but at this point I think it is more a matter of aesthetics than mechanical design. I’m happy with the current design and hope that perhaps a Lego fan with more art skills than I will take the design to the next step. My other hope is that perhaps the amazing folks at Lego will start producing transforming Lego sets. And of course, if they were Transformer branded, that would be a wonderful (but not necessary) bonus.
[Get the LDraw model for the car here . ]
Motivation, skill, and experience all play important roles in the design process, but they are no guarantee that you are going to be able to design, let alone build what you have set out to do. It almost always requires trial-and-error, serendipity, creative inspiration, research, and an open mind.
Next: Frequent Releases Improve Code Quality Faster
No comments:
Post a Comment